

Looking for a creative way to upcycle those empty wine bottles piling up in your recycling bin? Instead of tossing them out, transform them into stunning and functional pieces of home decor and unique gifts! This article curates 15 of the most inspiring and achievable DIY wine bottle craft ideas, ranging from elegant vases and rustic candle holders to whimsical garden ornaments. Get ready to unleash your inner artist and give your old bottles a beautiful second life.
Table of Contents
Wine Bottle Tiki Torches
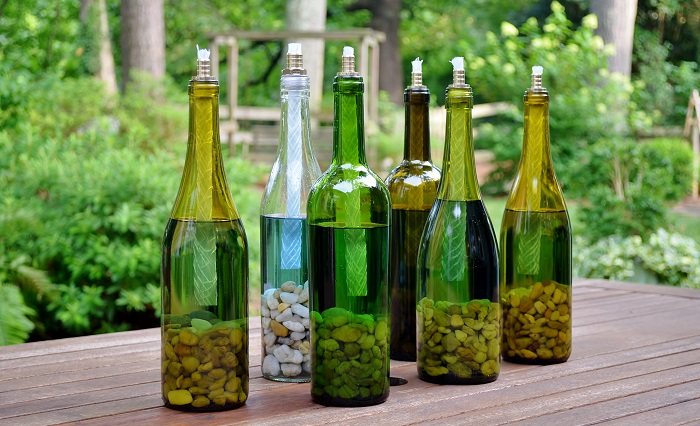
Turn those empty wine bottles into chic, functional tiki torches—a perfect way to add affordable and eco-friendly lighting to any outdoor space. These DIY torches not only set a cozy mood but also help keep mosquitoes away when filled with citronella fuel.
How to Make Your Own
Stabilize the Base
Pour sand or pea gravel into the bottom third of the bottle. This adds crucial weight and stability—especially useful on windy days or if placed on a table.Add Torch Fuel
Using a funnel, fill the bottle about three-quarters full with tiki torch fuel. A standard 750 ml bottle holds roughly 560 ml of fuel.Create the Wick Seal
Wrap a copper coupling generously with Teflon tape (about 10–20 layers) to form a tight, leak-proof seal when placed in the bottle neck.Insert and Trim the Wick
Thread a cotton wick through the coupling, leaving ¼” to 1″ above the top. Make sure it reaches the fuel and let it soak for 10–15 minutes before lighting. Trim as needed for a clean, steady flame.Protect the Wick
Consider using a copper cap to cover the wick when not in use. This protects it from rain and makes extinguishing the flame easier.
Perfect for patios, gardens, or balconies, these wine bottle tiki torches offer a classy and sustainable alternative to standard outdoor lighting.
Twine-Wrapped Wine Bottles
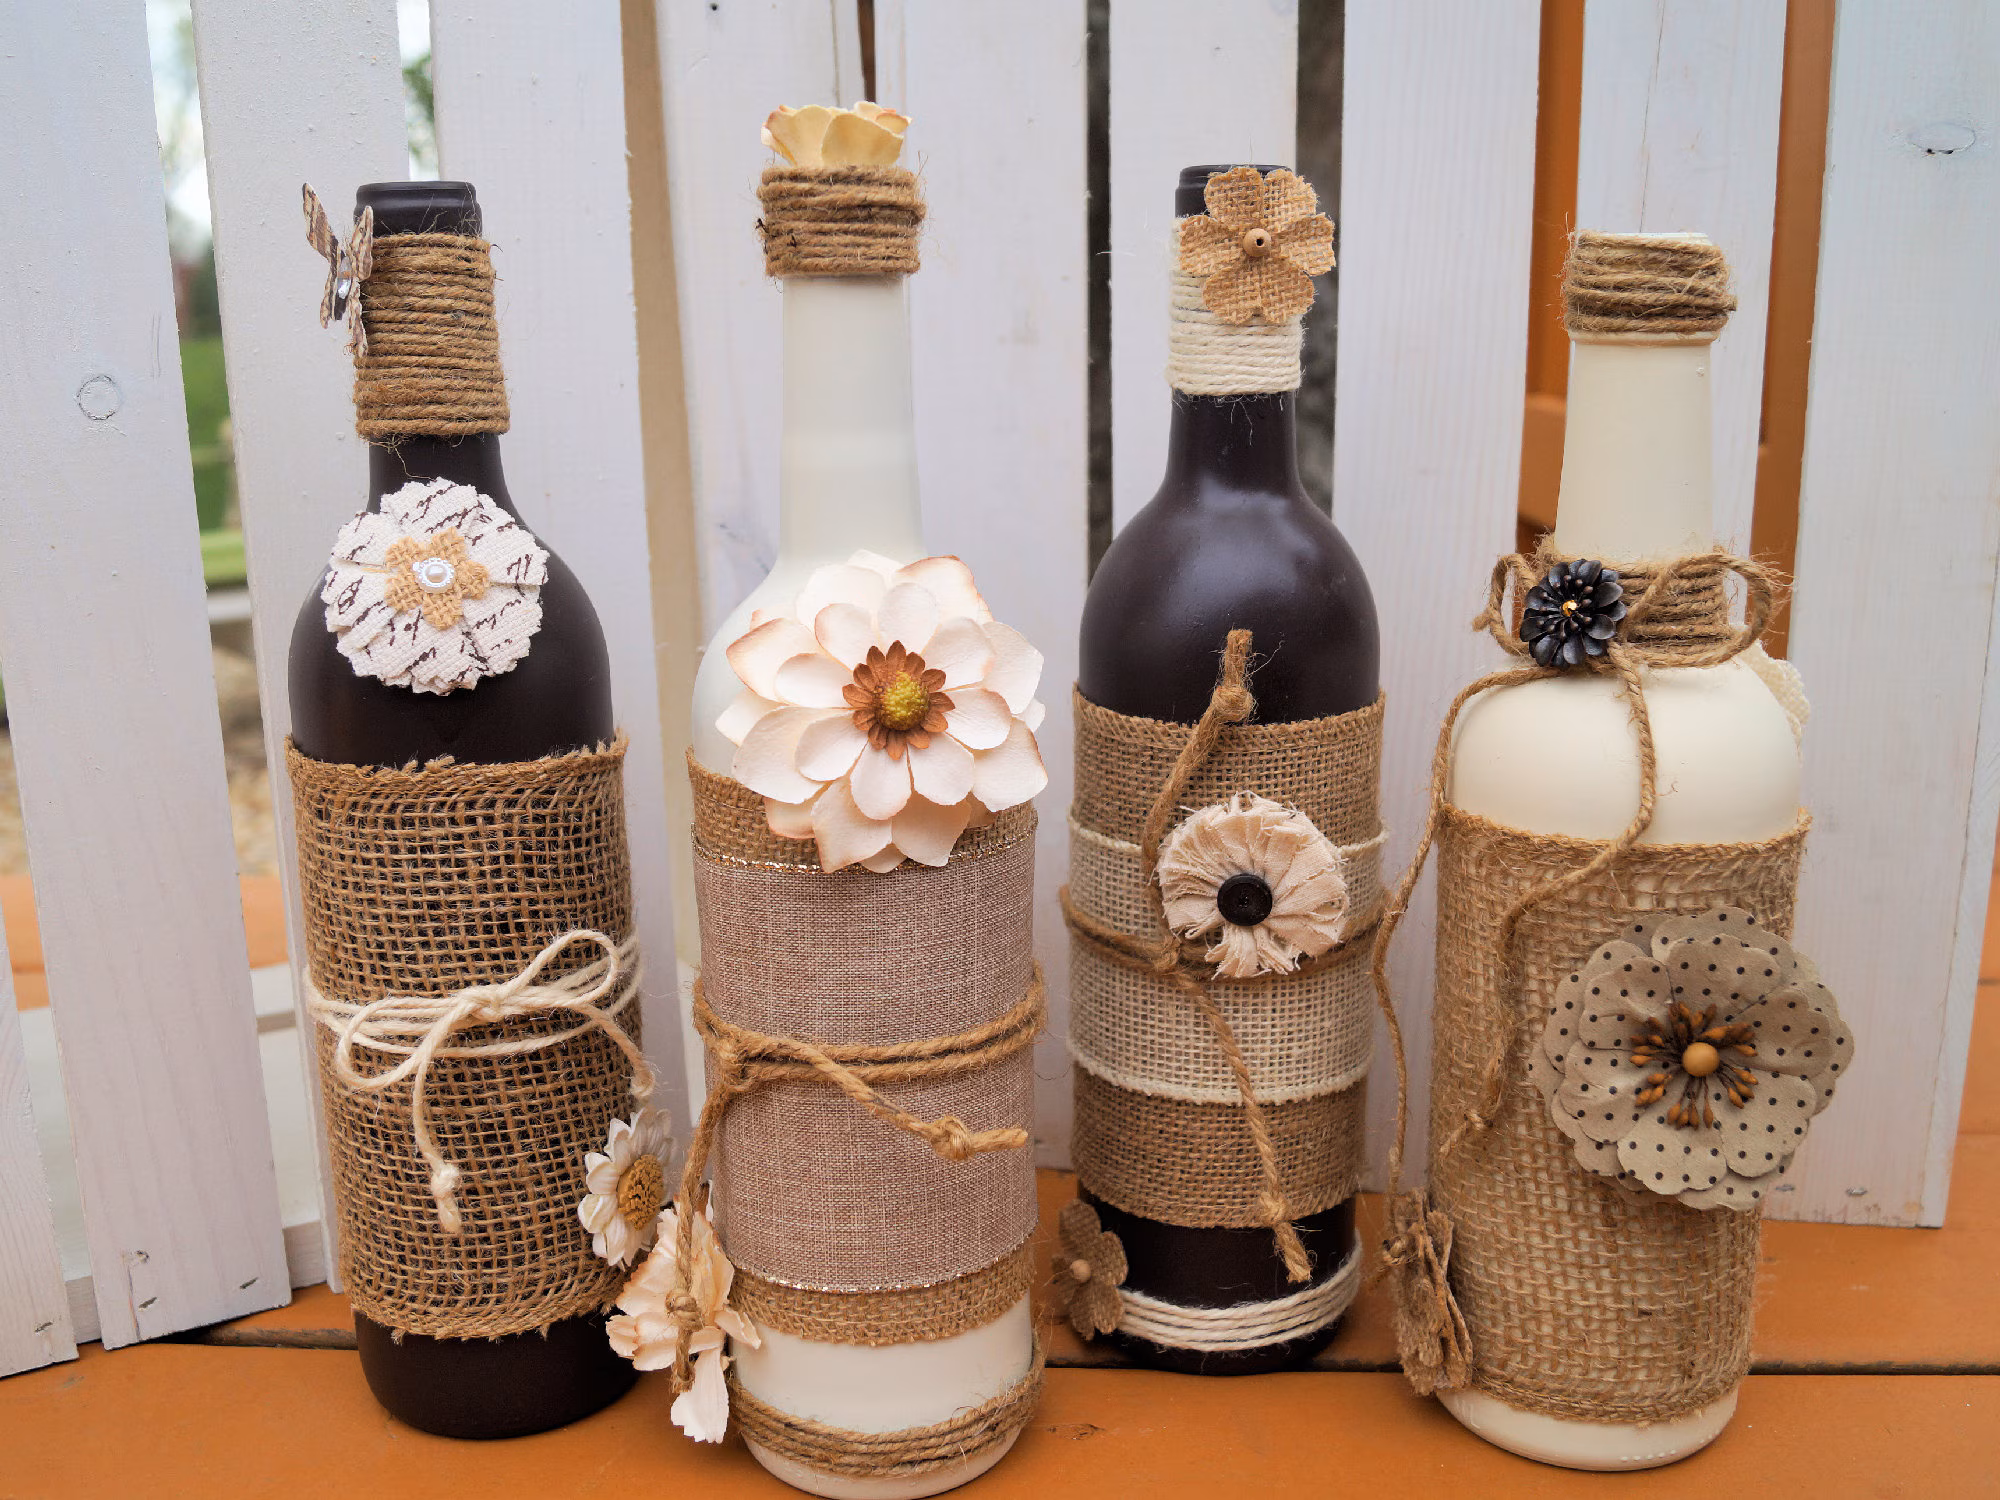
Turn simple empty wine bottles into charming rustic decorations with just twine, glue, and a little creativity. This easy project is perfect for adding a touch of farmhouse warmth to your home—whether as vases, centerpieces, or personalized gifts.
How to Make Twine-Wrapped Bottles
Anchor and Wrap
Apply hot glue at the base of the bottle, then firmly press the end of the twine into it. Wrap the twine snugly around, row by row, using more glue as needed to keep everything secure.Switch Colors or Materials
To change twine color or add ribbon, simply cut the current strand, glue the end, and start the new one where the last left off.Finish Cleanly
Leave extra twine at the top, tie a small knot, and secure it with glue to prevent unraveling.Add Embellishments
For extra charm, wrap lace, burlap, or attach items like buttons, shells, or dried flowers to match your style.
Ideal for both beginners and experienced crafters, this project offers a simple, affordable way to create beautiful decor that fits right into farmhouse, rustic, or shabby-chic interiors.
DIY Etched Wine Bottle Votive Holder
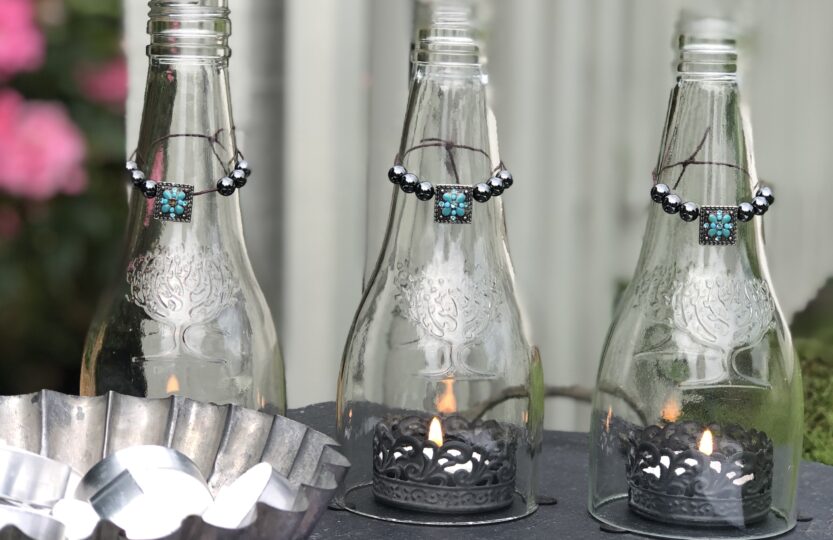
Transform empty wine bottles into beautifully etched candle holders—a simple and affordable way to create soft, personalized lighting perfect for any space. This project works for all skill levels and adds a custom touch to your decor.
How to Make Your Etched Bottle Candle Holder
Clean the Surface
Wipe the entire bottle with rubbing alcohol. This step is essential—it helps the stencil adhere properly.Apply the Stencil
Place a vinyl stencil (either custom-cut or pre-made) using transfer tape. Press firmly to secure the design, then carefully remove the backing.Apply Etching Cream
Use a brush to apply a even layer of etching cream over the stencil openings. Leave it on for the recommended time (usually 4–15 minutes), then rinse thoroughly and remove the stencil.Try an Alternative Finish
For a faster option, use frosted glass spray paint. Apply a light, even coat for a similar matte effect—no cream required
Final Touches
A painted, natural, or charred wood base complements the etched glass beautifully. Wrapping the bottom with jute cord or adding a metal accent offers extra rustic charm.
This etched wine bottle project combines creativity with sustainability—turning discarded bottles into elegant, functional decor that sets just the right mood.
Wine Bottle Floating Candle Holder
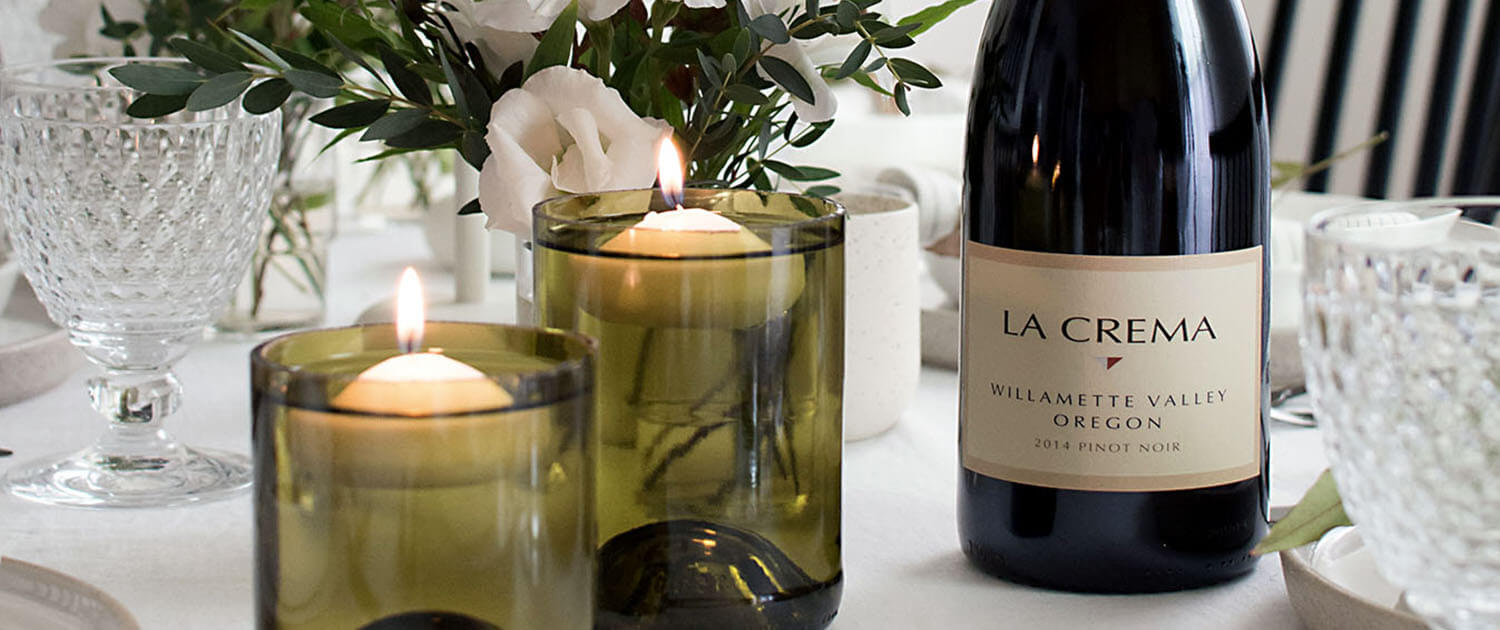
Turn empty wine bottles into elegant floating candle holders—a perfect way to create soft, ambient lighting for special occasions or everyday decor. This simple DIY project reuses glass in a beautiful way and fits right into both casual and formal settings.
How to Make Your Own Floating Candle Holder
Score the Glass
Use a glass cutter to make one smooth, continuous line around the bottle. A steady hand helps create a even score.Break Along the Line
Alternately pour boiling and cold water over the scored area. The temperature change encourages a clean break.Smooth the Edge
Sand the cut edge thoroughly for 2–3 minutes. This important step ensures the holder is safe to handle.Display and Enjoy
Once cleaned and smoothed, the holder is ready to use. Add water and a floating candle for a soft, glowing effect.
Perfect Group Activity
With a little practice, a small group can make 10–12 candle holders in about 90 minutes. It’s a fun and productive project for craft nights, bridal showers, or time with friends.
These floating candle holders offer more than functionality—they bring a warm, inviting glow to any space and turn simple bottles into memorable decor.
Self-Watering Wine Bottle Planter
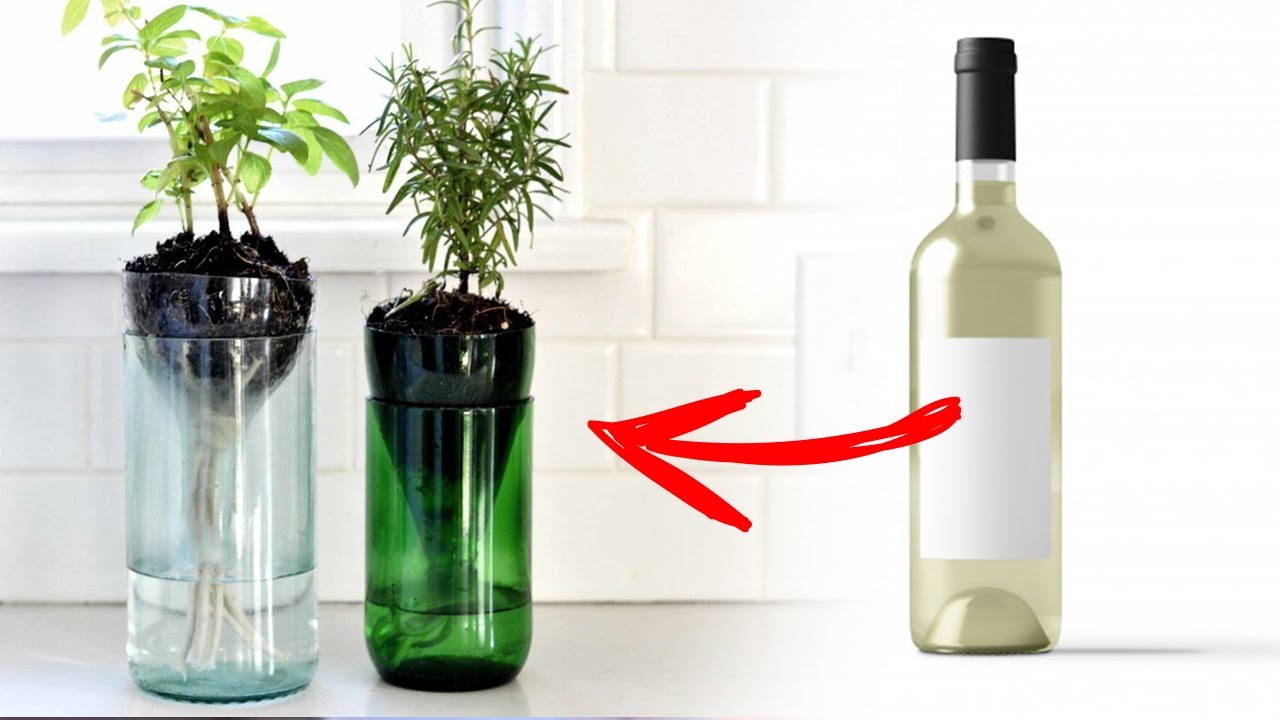
Transform an empty wine bottle into a practical self-watering planter—an ideal project for growing herbs like basil or mint with minimal upkeep. This eco-friendly idea is perfect for small spaces and adds a touch of green to any room.
How to Make Your Self-Watering Planter
Cut the Bottle
Use a bottle cutter for a straight, safe cut. Scoring and breaking usually takes 2–3 minutes. Alternative methods like the acetone-string technique can also work but require extra care.Smooth the Edges
Sand all cut edges with 150–300 grit sandpaper for 5–10 minutes. This prevents sharp edges and ensures safe handling.Insert the Wick
Fold a cotton or nylon cord into a loop, knot it, and thread it through the bottle’s neck. The loop sits in the soil while the ends extend into the water reservoir.Add a Filter
Place a small mesh or coconut fiber disk over the neck to keep soil from washing into the water below.Assemble the Planter
Invert the top section into the bottom, which should be filled with water. Make sure the wick reaches the bottom to draw moisture upward effectively.Sizing and Plant Care
A standard 750 ml bottle offers around 350–400 ml of soil space—enough for one small herb or young plant. The reservoir holds 375–750 ml of water, typically lasting 1–2 weeks. Herbs like basil in a sunny spot may use 200–250 ml per week.
This self-watering planter is a smart, sustainable way to support indoor gardening. It’s low-maintenance, reduces waste, and helps plants thrive—even when you’re busy.
Wine Bottle Bird Feeder
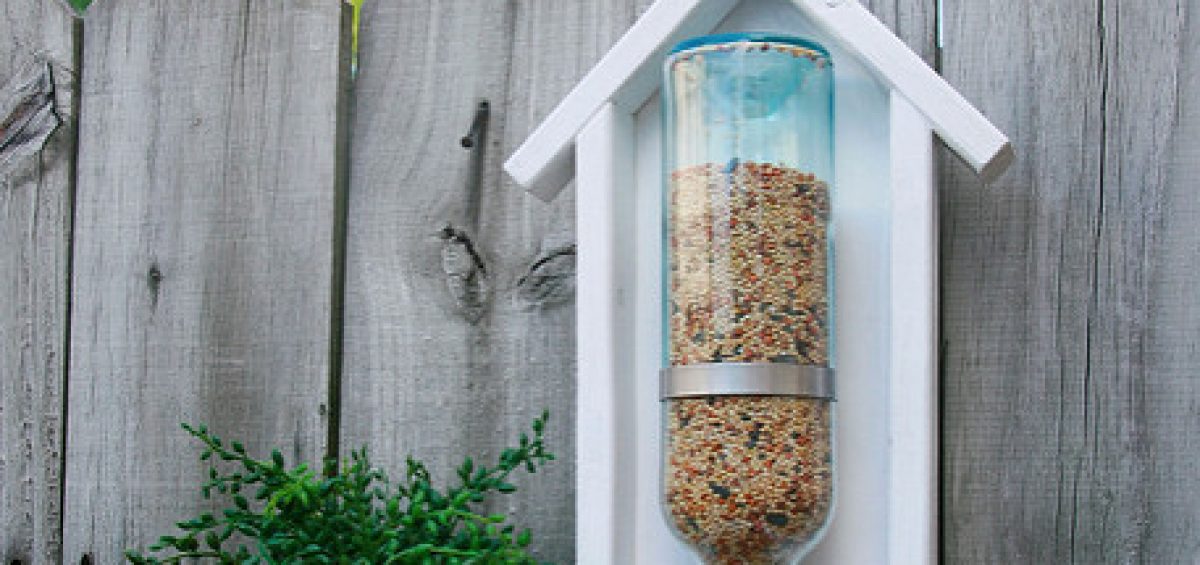
Turn an empty wine bottle into a charming and functional bird feeder that attracts feathered friends to your garden. This easy DIY project combines creativity with sustainability—offering a practical use for glass bottles while adding a decorative touch to your outdoor space.
How to Make Your Own Wine Bottle Bird Feeder
Secure the Bottle
Use wire wrapped firmly around the neck and body to create a hanger, or attach the bottle to a wooden stand with a hose clamp for easier cleaning and refilling.Add Feeding Ports
Carefully drill 2–4 small holes near the bottle’s base using a glass or diamond drill bit. Insert plastic or metal ports to dispense seeds.Attach a Seed Tray
Cut a piece of wood to fit beneath the bottle as a catch tray for fallen seeds. Reclaimed wood adds rustic charm.Hang Your Feeder
Use paracord for a colorful and easy-to-hang option, or wire for a more industrial look. Hang from a tree branch, shepherd’s hook, or mounted frame.
Ideal Placement
Hang your feeder where it’s visible from a window but out of reach of squirrels. Trees, hooks, or custom stands all work well.
This wine bottle bird feeder is a fun, eco-friendly project that enhances your garden and supports local wildlife—all while giving empty bottles a beautiful second life.
Wine Bottle Lamps
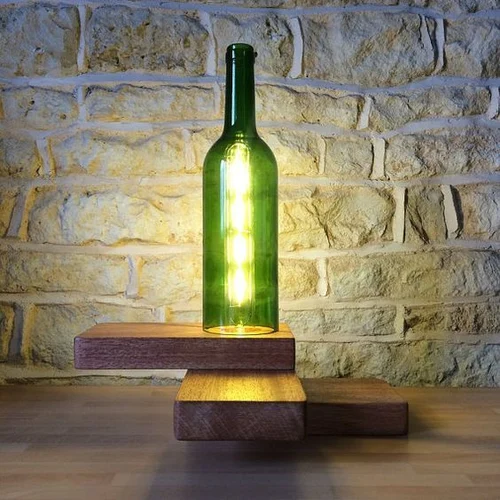
Transform empty wine bottles into stylish and functional lamps with this straightforward DIY project. Perfect for adding personalized and eco-friendly lighting to any room, these handmade lamps bring both character and sustainability to your decor.
Step-by-Step Assembly
Drill the Cord Hole
Using a glass drill bit, make a hole near the base of the bottle. Drill slowly and use water to cool the bit and avoid cracking the glass.Thread and Secure the Cord
Feed the lamp cord through the hole and tie an underwriter’s knot inside the bottle to strain-relieve the wire.Stabilize the Neck
Place a rubber grommet or plug into the bottle’s neck to protect the cord and help the lamp stand upright.Attach the Socket and Harp
Secure the threaded rod from the lamp kit, then assemble the socket and attach the harp for the shade.Add the Lampshade
Choose a shade that complements your space—larger shades soften the light, while smaller ones highlight colored glass.
Ideal for gifting or selling at craft markets, wine bottle lamps are a creative way to reduce waste while designing lighting that’s truly your own.
Wine Bottle Candles
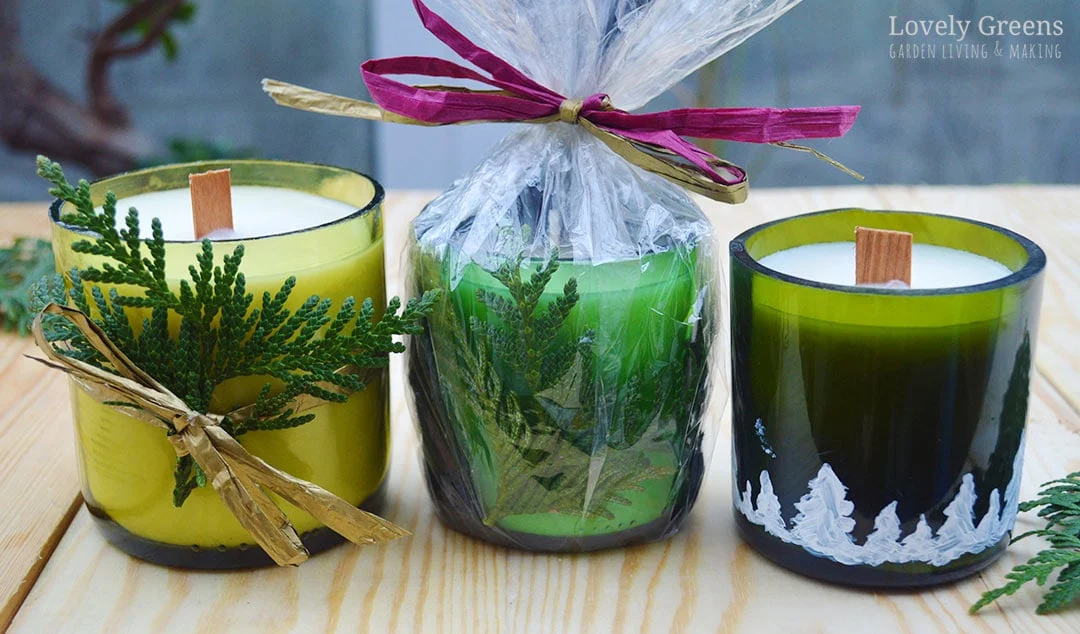
Turning empty wine bottles into candles is a popular upcycling project—it adds a cozy, custom feel to any home. The process takes roughly 2 hours, and the end result is a unique, sustainable candle that’s well worth the time.
Step-by-Step: Making Wine Bottle Candles
Cut the bottle
Use a glass scoring tool to make a straight line around the bottle. To separate the glass, soak the scored line in boiling water for 20–30 seconds, then plunge it into ice water. Repeat until you hear a gentle crack—this ensures a clean break.Smooth the edges (safety first!)
This step is non-negotiable. Sand the rim of the cut bottle (both inside and out) until it feels completely smooth to the touch. Spending a few extra minutes here prevents sharp edges later.Secure the wick
Use hot glue to attach the candle wick to the center of the bottle’s base. Centering it correctly ensures the candle burns evenly.Pour the wax
Melt your chosen wax, then pour it into the bottle at 130–150°F (54–65°C). This temperature range stops cracks from forming on the wax surface. Fill the bottle, but leave 1/2 inch of space at the top—this accounts for wax expansion.Let it cure
Let the candle set overnight at room temperature. Curing helps the wax dry with a smooth finish and keeps it from pulling away from the glass.
This DIY turns empty bottles into beautiful, useful pieces—and the best part is how easy it is to customize them to match any style or occasion.
Fall-Inspired Wine Bottle Décor
Turn empty wine bottles into charming autumn decorations with these simple and affordable DIY ideas. Perfect for adding a cozy seasonal touch to your home, these projects use basic craft supplies like paint, Mod Podge, jute twine, burlap, and LED cork lights.
Fall Leaves Decoupage Bottle
Apply Mod Podge to a clean bottle and smooth a fall-themed napkin over the surface. Once dry, wrap jute around the neck for rustic appeal. Insert pampas grass or faux stems to create an elegant autumn vase.DIY Scarecrow Bottle
Fill a clear bottle with raffia to mimic straw. Use hot glue to shape a burlap hat at the neck, then paint or apply a vinyl cutout face. Embellish with artificial berries and leaves. For extra charm, add an LED cork light inside.Lighted Fall Quote Bottle
Apply vinyl lettering with a seasonal quote or design to a clear bottle. Fill the interior with battery-powered string lights and artificial leaves. Wrap more twine and leaves around the neck for a finished look—ideal for mantels or dining tables.
These fall bottle crafts are trending each autumn and make wonderful seasonal decor. Whether displayed alone or in groups, they bring warmth and creativity to your home without costing a fortune.
Mixed Media Wine Bottle Art
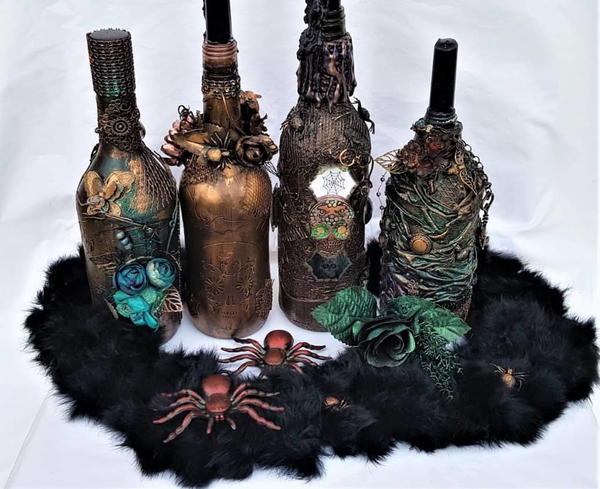
Transform ordinary wine bottles into striking works of art with mixed media techniques. By combining paint, texture, and decoupage, you can create deeply personalized decor or one-of-a-kind gifts that are full of character and tactile appeal.
How to Create Your Own Mixed Media Bottle Art
Base Coating
Cover the bottle with black gesso or acrylic paint. This creates a consistent background and helps later colors and textures stand out.Background Painting
Use sponges or soft brushes to build up background colors. Gradients, ombre effects, or solid bold shades all make great foundations for further decoration.Adding Texture
Wrap jute, rope, or metallic trim around the neck. Attach air-dry clay shapes, fabric pieces, buttons, beads, or other small objects using strong adhesive.Applying Images
Decoupage napkin fragments, rice paper, or printed images onto the surface. Floral, abstract, or natural motifs work especially well for building visual depth.Enhancing the Surface
Dry-brush metallic paints for highlights, sprinkle glitter into wet glue, or add fine sand or gravel for gritty texture.Sealing the Artwork
Protect all layers with a clear varnish. Choose gloss for shine or matte for a subtle, contemporary finish.
Mixed media bottle art offers endless possibilities for expression. Each piece becomes a unique textural showcase—perfect for home styling, themed decor, or heartfelt gifting.
Chalkboard Wine Bottle Message Center
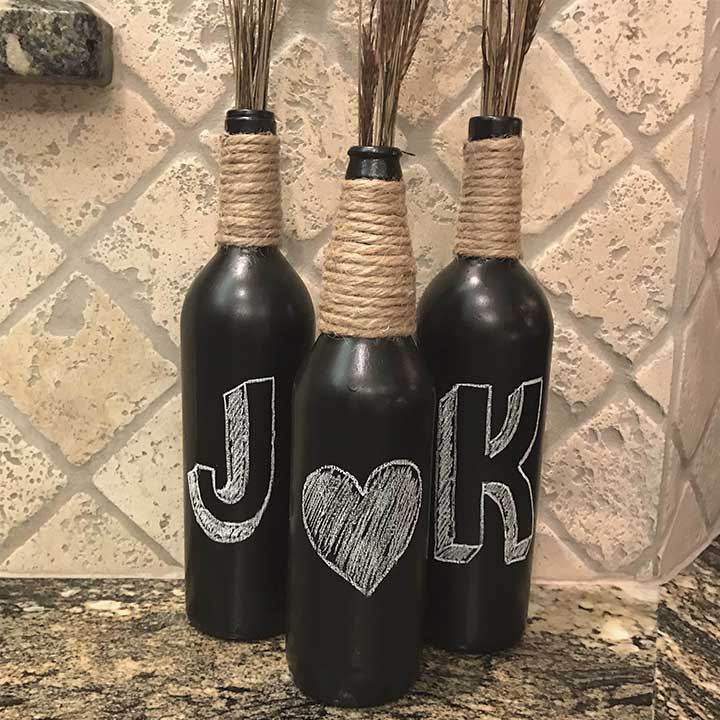
Turning empty wine bottles into chalkboard message centers is a clever, practical DIY project—it adds creative organization to any space while repurposing old glass. These handmade pieces work as reusable labels, menus, or fun notes, fitting perfectly for homes and events alike. Below’s a simple breakdown of how to make them, plus ideas for using them.
How to Make a Chalkboard Wine Bottle Message Center
Apply chalkboard paint
Use either chalkboard spray paint or brush-on chalkboard paint. For a neat finish, use painter’s tape to mask off a specific “label area” (great for targeted messaging). If you want more writing space, feel free to paint the entire bottle instead.Painting tips for best results
Apply two thin coats of paint—thick coats can bubble or peel. Let each coat dry for 30–60 minutes, then let the final paint cure fully for 24 hours. Rushing the drying time can ruin the finish.Condition the chalkboard surface
Once the paint is fully dry, rub the side of a chalk stick across the entire painted area, then wipe it off with a dry cloth. This step “conditions” the surface, preventing old messages from leaving faint, hard-to-remove marks later.
This DIY project balances practicality and fun: it keeps spaces organized, adds a custom touch to any occasion, and gives new life to recycled glass. It’s a simple way to add personality to homes or events without breaking the bank.
Wine Bottle String Lights
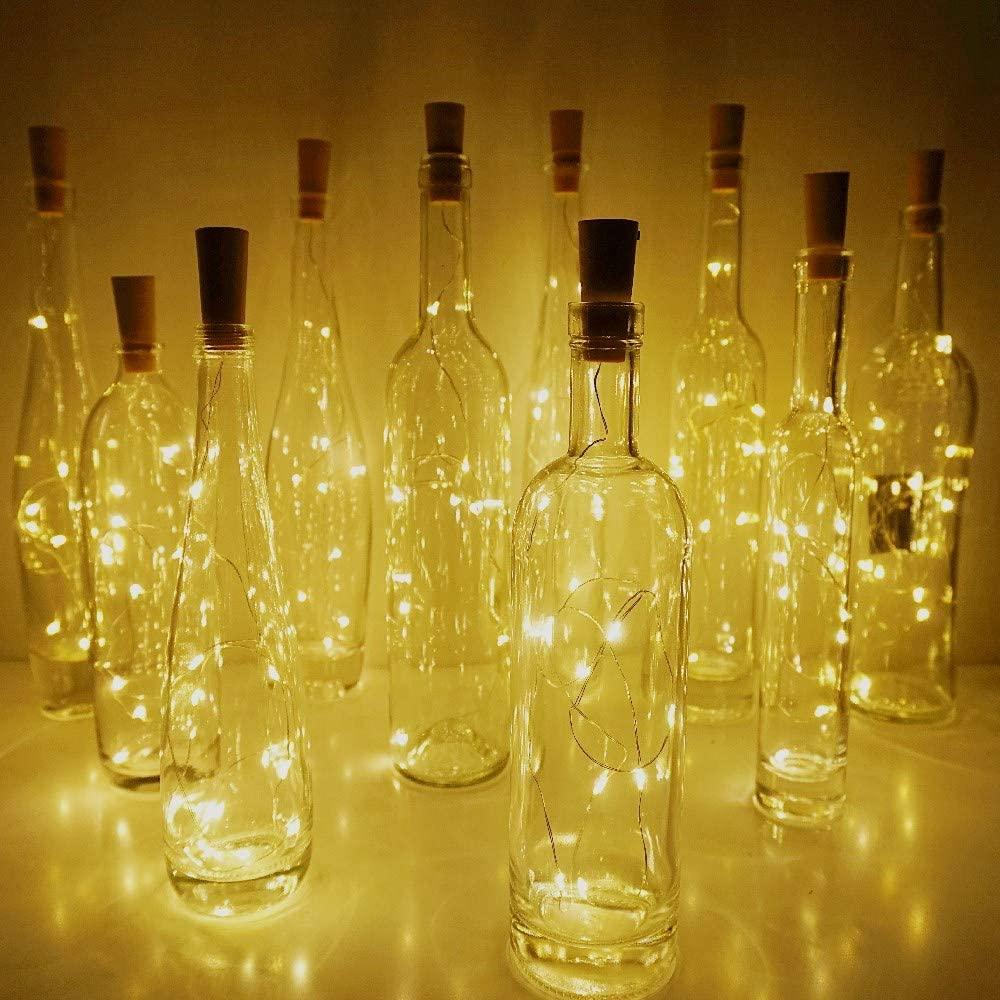
Transform empty wine bottles into enchanting sources of light with this simple DIY project. Perfect for parties, cozy evenings, or handmade gifts, these bottle lights add a soft, magical glow to any indoor or outdoor space.
How to Make Your Own Wine Bottle Lights
Drill the Entry Hole
Start by placing painter’s tape on the bottle to prevent slipping. Use a diamond drill bit to make a clean ½” hole near the base.Insert the Lights
Thread fairy lights through the hole—copper wire strings work especially well. For easier placement, battery-powered cork lights can simply be placed into the bottle opening.Conceal the Power Source
Tuck battery packs discreetly near the bottle or opt for cork-style LED lights that look like original closures.Protect the Cord
Add a rubber grommet around the wire entry point to prevent damage from sharp glass edges.Decorate the Bottle
Before lighting, personalize your bottle with twine, decoupage, glued-on pebbles, or painted designs.
Ideal for gifts or home decor, wine bottle string lights are a creative, eco-friendly way to turn discarded glass into something warm and wonderful.
Mosaic Wine Bottle Vases — a concise how-to
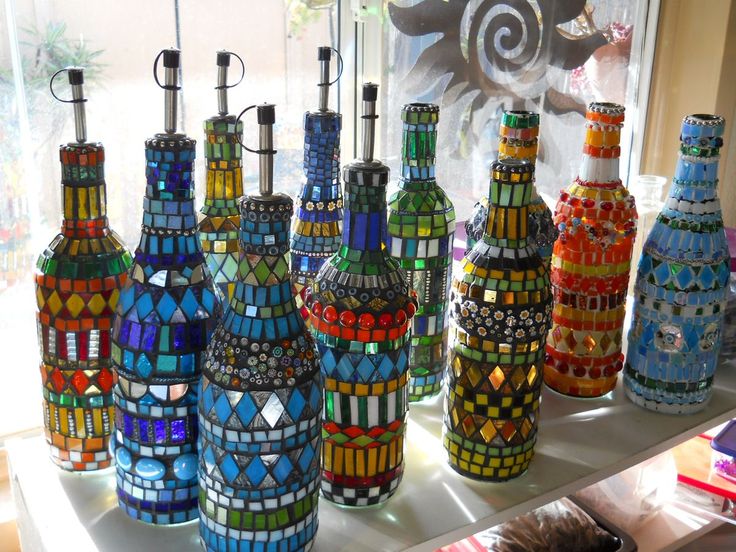
Crafters love turning empty wine bottles into mosaic vases: it’s a simple, colorful way to recycle glass and add texture to a room. Below is a clear, friendly guide that keeps the process practical and easy to follow.
Step-by-step
Plan the layout. Arrange pieces on a table to test patterns and make sure they fit the bottle’s curves.
Attach pieces. Fix tiles or shells with clear silicone; keep grout lines about 1/8″ for a neat look. Follow the bottle’s shape as they work.
Let adhesive set. Wait until everything is firmly bonded before grouting.
Mix and apply grout. Use the 1:7 ratio to reach a thick texture. Makers have about 15 minutes of workable time — press grout into gaps with a putty knife or finger so no glass shows.
Clean and buff. Wipe excess with a damp sponge, let sit ~30 minutes, then buff tiles with a dry paper towel to remove film.
Seal and cure. Let the vase dry 24 hours. For extra protection, brush on grout sealer. Note: these are best for dried flowers or decoration, not as fully waterproof vessels.
Mosaic wine bottle vases are low-cost, highly customizable decorations. With a little planning and the right materials, makers can create pieces that suit any room or season.
Wine Bottle Wind Chimes — a short, friendly how-to

Crafters who like upcycling often turn empty wine bottles into wind chimes. They’re a cheap, creative way to add gentle music and visual interest to patios, porches, or gardens. Below is a clear, easy guide that focuses on sound, safety, and simple styling.
Step-by-step
Cut the bottles. Score at the chosen height; 6–12″ tubes give deeper tones, shorter pieces give brighter notes. Use the hot/cold water method to separate.
Smooth the edges. Sand or fire-polish until edges are safe and neat.
Drill holes. Use a diamond bit to make a hole through each neck or top for hanging.
String and secure. Thread fishing line or wire, add crimp beads and key rings so each piece hangs reliably.
Add sounders. Hang washers, caps, or wood under each tube at varied lengths to get different tones.
Assemble and hang. Attach all pieces to a branch, metal ring, or plank. Add a wind-catcher below for movement.
Wine bottle wind chimes are forgiving projects: they’re easy to customize, inexpensive, and rewarding to hang up. With basic tools and a little care, makers can craft outdoor pieces that look great and sound lovely.
In short, these 15 DIY wine bottle projects show how a little creativity and basic tools can turn empty bottles into useful, beautiful pieces—vases, wind chimes, lamps, planters, and more—suitable for gifts, home decor, or the garden. No matter the style—beachy, modern, or rustic—there’s a project here to match a crafter’s skill and space. For anyone who needs reliable bottles in small or bulk quantities, TP Glass Bottle Manufacturer offers a wide selection of quality wine bottles and custom options at competitive factory pricing—perfect for hobbyists, studios, and wholesale buyers.