

If you have a collection of empty glass jars, you possess a great starting point for a simple DIY project. Rather than leaving them as plain, functional containers, you can easily turn them into decorative pieces that reflect your personal style. Decorating glass jars doesn’t require advanced skills or expensive tools. In fact, you can achieve impressive results with common craft supplies. Let’s explore some straightforward techniques to help you get started.

Spray Painting Glass Jars for a Flawless Finish
Spray painting is one of the simplest and most effective ways to give Glass Jars a completely new look. Whether you’re updating them for home décor, crafts, or as DIY gifts, this method delivers a smooth, professional-looking result with just a few key steps.
The secret to a durable and even coat lies in the preparation. Always begin by thoroughly cleaning the jar with warm, soapy water, followed by a wipe-down with rubbing alcohol. This removes any invisible oils or fingerprints that could prevent the paint from adhering properly. If you want to create clean sections or patterns, now is the time to apply painter’s tape to any areas you wish to keep paint-free.
When you’re ready to paint, follow these core principles for the best outcome:
-
Work in a well-ventilated space and protect yourself with gloves and a mask.
-
Shake the spray can vigorously before and during use to ensure the paint is well-mixed.
-
Apply multiple light coats instead of one heavy one. Hold the can 8–12 inches away and use a steady, sweeping motion.
Allow each thin coat to dry for about 10–20 minutes before applying the next. Building up the color gradually is what prevents drips and streaks. For certain finishes, like a rich metallic, you might find that a single, slightly heavier coat achieves a brighter shine than multiple layers, which can sometimes dull the effect.
Once you’re happy with the coverage and the jar is completely dry, consider sealing your work with a clear acrylic sealer. This protective topcoat is highly recommended for items like vases or storage jars that will be handled frequently, as it locks in the color and prevents chipping.
With a little patience between coats, you can transform simple Glass Jars into elegant centerpieces, stylish candle holders, or custom storage containers. This straightforward technique opens up a world of decorative possibilities.
Decoupage with Paper or Fabric
For a truly personalized touch, decoupage is a fantastic technique for decorating glass jars. This method involves adhering paper or fabric to the glass using a special glue like Mod Podge, allowing you to create one-of-a-kind designs for gifts or home décor. With the right materials, you can even create durable, dishwasher-safe pieces for everyday use.
The key to a successful decoupage project lies in careful preparation. Always start with a clean surface by washing the jar with warm, soapy water and then wiping it down with rubbing alcohol to remove any lingering residue.
When you’re ready to begin, focus on these core steps:
-
Cut and Position: Trim your chosen material—such as scrapbook paper, fabric, or the thin printed layer of a napkin—to your desired shape. For a softer look, try tearing the edges of napkins. If the material is thick, lightly dampening the back can make it easier to wrap around the curved glass.
-
Adhere and Smooth: Apply a thin, even layer of Mod Podge to the jar, then carefully place your design. Use a squeegee or a piece of plastic to smooth it out, working from the center outward to eliminate air bubbles and excess glue.
-
Seal for Durability: Once the first layer is dry, apply at least two topcoats of Mod Podge, allowing sufficient drying time between each. For a truly permanent and dishwasher-safe finish, let the jar cure for a full 28 days.
A helpful tip for a professional look is to overlap paper elements to conceal seams. This technique is perfect for creating beautiful candy jars with decorative paper bands or Mason Jars adorned with soft, torn napkin edges. With a little patience, you can easily transform simple jars into custom storage or gift items.
Wrapping with String, Twine, or Yarn
Wrapping glass jars with string, twine, or yarn is an easy and affordable way to add rustic charm or a pop of texture to your décor. This simple technique works on almost any glass jar or bottle and requires only a few basic supplies, making it perfect for creating unique centerpieces or personalized gifts.
To get started, ensure your jar is clean and dry. You’ll need your chosen wrapping material, a good craft glue or hot glue gun, and a pair of scissors.
The wrapping process itself is straightforward. Begin by securing the end of your string or twine to the jar with a small dab of glue, either at the base or just below the rim. Then, wrap the material steadily around the jar, keeping the strands tight and close together to avoid gaps. For a secure hold, it helps to add another small dot of glue every few rounds, especially when working on curved surfaces.
Here are a few tips to enhance your project:
-
Material Choice: Thicker materials like jute twine or bulky yarn cover space quickly, while finer strings allow for more detailed patterns.
-
Creative Variations: Try wrapping only a section of the jar for a striped effect, or incorporate charms and tags before sealing the end.
Once you’re comfortable with the basic method, you can experiment with color combinations or mixed materials to create coordinated sets for your home or special occasions. This versatile craft offers endless possibilities for stylish, handmade decorations.
Decorating Glass Jars with Buttons, Pom-Poms, and 3D Embellishments
For a playful and textured look, adorning glass jars with buttons, pom-poms, and other 3D trinkets is a simple and enjoyable approach. This method is perfect for creating seasonal crafts or personalized gifts, requiring only a few basic supplies like a hot glue gun or strong craft glue to transform an ordinary jar into something unique.
The process is quite flexible. You can apply a thick layer of a strong adhesive like Mod Podge Collage Clay and press buttons or other lightweight embellishments directly into it. Alternatively, a hot glue gun offers a quick bond for individual pieces.
A few creative approaches can help you get started:
-
Theme-Based Designs: Create simple figures like a snowman using buttons for coal eyes and a small orange pom-pom for the nose. For a reindeer, a red pom-pom makes a perfect Rudolph nose.
-
Pattern Play: Arrange buttons in vertical lines, geometric shapes, or simple patterns like hearts. Sometimes, just a few strategically placed accents per side can be more effective than covering the entire jar.
When selecting materials, consider the final use of the jar. Hot glue is ideal for a quick, strong hold with heavier items, while craft glue or specialty collage clay may be better for full, textured coverage. Feel free to mix materials—combining ribbon, felt, and buttons can create a wonderfully layered effect.
This is a highly accessible craft that encourages experimentation. With a little imagination, you can easily produce charming, one-of-a-kind jars perfect for gifting or brightening up your home decor.

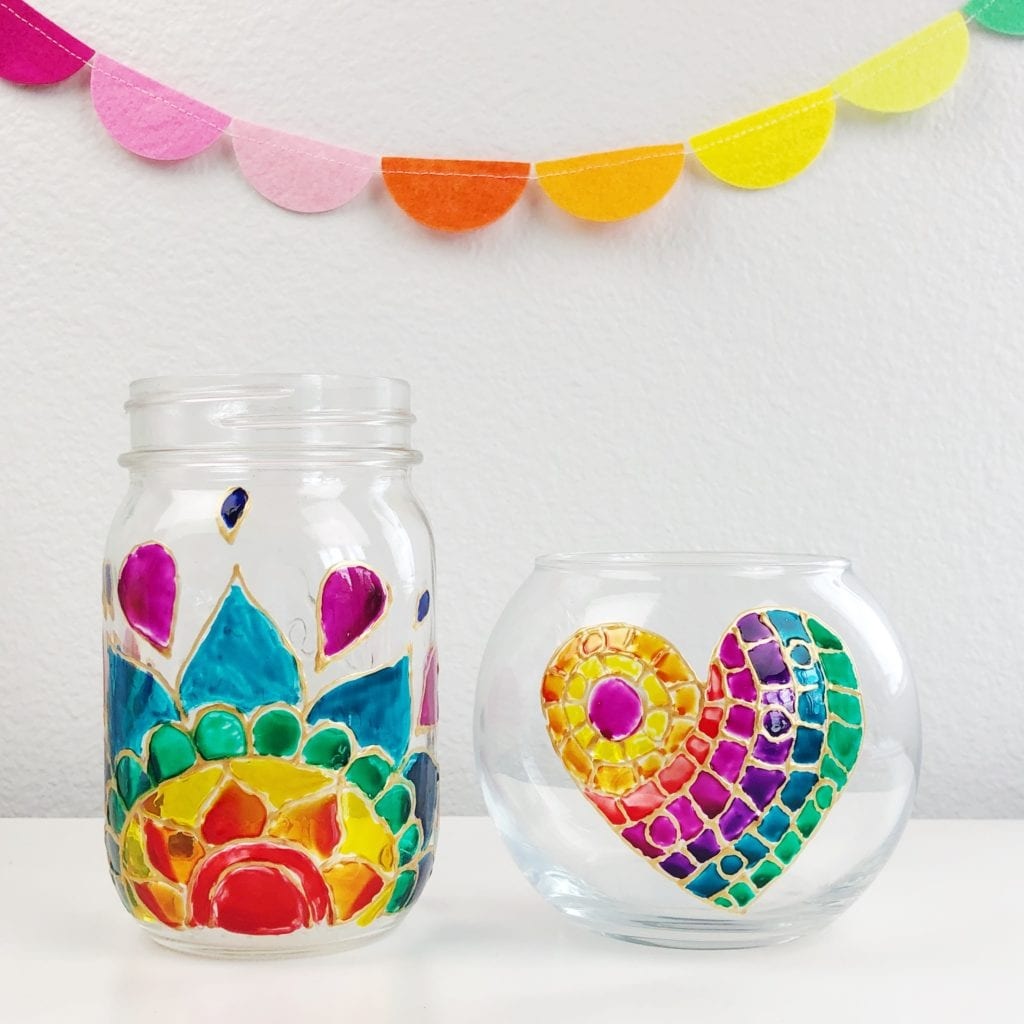
Food Coloring Jar Tinting: Easy DIY Stained Glass Jars
For a beautiful stained glass effect, tinting jars with food coloring offers a simple and affordable solution. This technique uses common supplies like Mod Podge or craft glue mixed with food coloring to create vibrant, light-catching containers perfect for décor, party accents, or unique storage.
To begin, ensure your glass jars are thoroughly clean and dry. The basic tinting mixture combines about 1/4 cup of Mod Podge Gloss with 4 to 12 drops of gel food coloring, depending on how intense you want the color to be.
The application offers two main approaches:
-
For even, all-over color: Swirl the mixture inside the jar, coating the entire interior before pouring out the excess.
-
For a water-resistant finish: Apply the mixture to the exterior of the jar using a foam brush. This method is better for vases or jars that might be handled frequently.
After applying the color, place the jar upside down on parchment paper to dry for about 24 hours. For a faster, more durable result that sets the color and prevents streaking, you can bake the jars in an oven at 225°F (107°C) for approximately one hour.
A few tips can help achieve the best look:
-
Mix the color and glue thoroughly to minimize streaks.
-
For subtle pastels, use fewer drops of coloring; for bold, vibrant hues, add more.
-
Applying the tint to the jar’s exterior makes it more suitable for holding water or being washed.
This method is a wonderfully versatile way to create custom-colored jars that can fit any style or occasion, all with a charming, translucent finish.
Creating 3D Effects on Glass Jars with Hot Glue or Air-Dry Clay
Adding three-dimensional designs to glass jars is an easy way to turn them into standout decorative pieces. Using simple materials like hot glue or air-dry clay, you can create raised patterns, textured motifs, or even sculptural details—perfect for DIY gifts, home accents, or themed centerpieces.
Hot Glue Technique
Hot glue is great for quick, freehand designs. Simply draw directly onto a clean, dry jar using a glue gun, building up swirls, dots, or lace-like patterns in layers for added depth. Once the glue sets (usually within an hour), you can paint over it with acrylics or spray paint to highlight the texture. Embellishments like glitter or rhinestones can be pressed into the glue while it’s still slightly tacky.
For more structured shapes, you can also use silicone molds to create individual hot glue embellishments, which can then be attached to the jar.
Air-Dry Clay Method
Air-dry clay allows for more sculptural possibilities. Roll the clay into ropes or shape it into flowers, leaves, or geometric forms, then press them firmly onto the jar’s surface. Let the clay dry completely—this usually takes 24 to 48 hours depending on thickness—before painting and sealing for durability.
A few tips to keep in mind:
-
For hot glue, applying a thin layer of dish soap or cosmetic cream to the jar first can make removal easier if you want to reuse the glass later.
-
With air-dry clay, uniform thickness helps it dry evenly and adhere securely.
Whether you choose the instant gratification of hot glue or the sculptural flexibility of clay, both methods offer an affordable way to create custom, textured jars that look far more expensive than they are. Perfect for anyone looking to add a personal touch to their decor without a major time or cost investment.
Conclusion
In summary, transforming ordinary glass jars is an accessible and rewarding craft. Whether through the sleek finish of spray paint, the personalized touch of decoupage, the rustic charm of twine, the playful dimension of 3D embellishments, or the vibrant hue of food coloring tinting, each method offers a unique path to creating beautiful, custom décor.
The best part? You don’t need to be an expert to achieve stunning results. The true foundation of any great DIY project is, of course, starting with a high-quality blank canvas. As a professional Glass Bottle Manufacturer, TP Glass Bottle Manufacturer is dedicated to providing you with precisely that. We produce a wide range of durable and beautifully shaped glass jars and bottles, perfect for unleashing your creativity.